In this guide, you will create a new token on Solana. We'll be using the Solana CLI, the new Token Extensions program and the Token Metadata extension, which allows us to simplify the process a little.
The steps in this guide are for the Token Extensions Program, i.e. program ID
TokenzQdBNbLqP5VEhdkAS6EPFLC1PHnBqCXEpPxuEb. This Token Extensions program
simplified making tokens because metadata - like the token name, symbol and the
URI for the file that describes images - can be
stored directly on the token mint.
The older Token Program, i.e. program ID
TokenkegQfeZyiNwAJbNbGKPFXCWuBvf9Ss623VQ5DA required storing metadata in an
additional account outside our mint. Tokens using the metadata extension have
wide support in Solana Wallets and Explorers, but if you can also
use the older token program and Metaplex
instead.
Installing Solana Tools #
First we need to download Solana tools to our system. Follow this guide to install the Solana CLI.
Create folder #
Open a new terminal and create a new folder:
mkdir new-token
cd new-token
Create a keypair for the mint authority #
In a moment, we will make a token mint account - i.e., a factory that makes our specific token. But before we do that, we'll need to create an account to use as our mint authority - which you can think of as the 'boss' that will run that factory. We'll also use this account as the freeze authority and metadata update authority. This account will need to sign transactions that mint new tokens, freeze the mint, or update the metadata for our token.
Let's make 1 keypair where the public key starts with bos, short for 'boss'.
You can add more letters, but it will take longer to generate the key. Four is
still ok, but five will take a long time.
solana-keygen grind --starts-with bos:1This will save the keypair into a JSON file, named after the public key:
bosy1VC2BH2gh5fdXA3oKn53EuATLwapLWC4VR2sGHJ.jsonReplace the bos public key above with your mint authority public key in the
following steps!
Keep the contents of the mint authority keypair file safe. Whoever owns the key will be able to mint tokens, update metadata, and potentially freeze token accounts!
Configure the Solana CLI to use to use the keypair we just created, for example:
solana config set --keypair bosy1VC2BH2gh5fdXA3oKn53EuATLwapLWC4VR2sGHJ.jsonWe will also set the Solana CLI to use devnet:
solana config set --url devnetFrom now on, all transactions you run from the CLI will be signed using the
bos keypair and be on devnet.
You can see the current configuration by running:
solana config get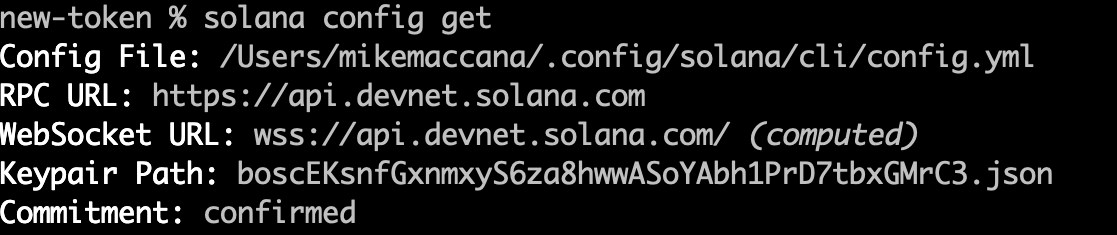 solana config get showing devnet and our mint authority account
Get some Devnet SOL for the mint authority #
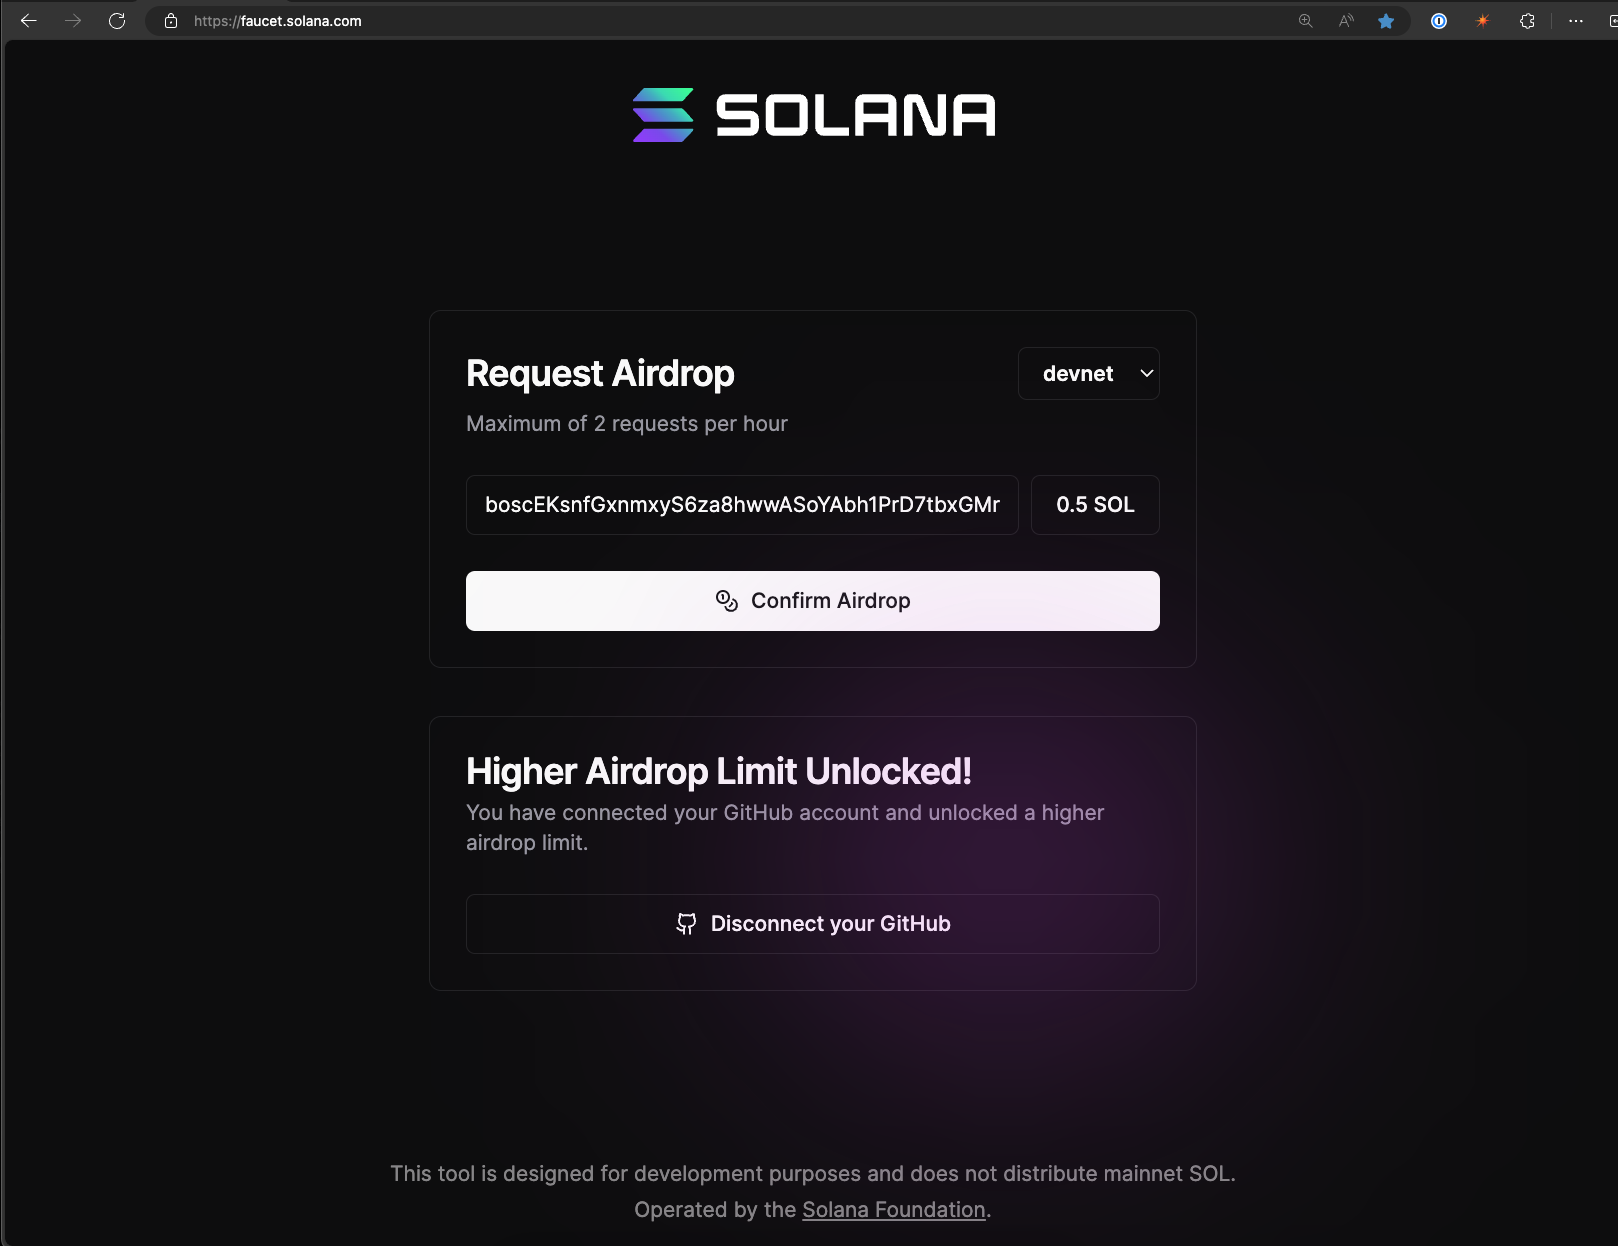 Solana Faucet
For Solana devnet we will just be able to get some free SOL,
the DevNet faucet If you get rate limited, follow
this
guide to get devnet SOL.
Remember to fund your mint authority account - i.e. the keypair that starts with
bos in your new-token folder. To get your address, you can also just run:
solana addressFor mainnet you will need to fund the account with actual SOL. You can buy SOL with regular currency in places like centralized exchanges, crypto on-ramps, or swap other tokens for SOL on decentralized exchanges.
Make a Mint Address #
Let's create one more address that we will use for our Mint Account - the
factory that makes our specific token. We'll make it start with mnt to help us
remember it's the token mint account.
solana-keygen grind --starts-with mnt:1It will save a new keypair named after the public key:
mntTymSqMU4e1NEDdxJ9XoPN4MitCgQ7xxGW6AuRAWQ.json
Replace the mnt address with your token mint account's address in the
following steps!
Creating the token mint account #
First, let's decide on a decimal place. Since computers use binary, they can't handle decimal numbers very well. That's why financial programs - both in traditional finance and blockchains - usually transfer value in a whole amount of minor units, e.g., cents (for USD) or pence (for GBP). Likewise, you can set a decimal point for the token. For example USDC has 6 decimals, which means that each USDC can be split into one-millionth of a USDC. To transfer 1 USDC, you transfer 1 million USDC cents.
You can configure different decimals for your token by adding the --decimals
flag to the command. If you do not set it, the default is 9.
Now, we will create the token mint, specifying to use the Token Extensions
Program (TokenzQdBNbLqP5VEhdkAS6EPFLC1PHnBqCXEpPxuEb), with the metadata
extension enabled.
We will use our mnt... address as the
token mint account for our new token:
spl-token create-token --program-id TokenzQdBNbLqP5VEhdkAS6EPFLC1PHnBqCXEpPxuEb --enable-metadata mntTymSqMU4e1NEDdxJ9XoPN4MitCgQ7xxGW6AuRAWQ.jsonIf desired, this is also the time to add additional token extensions to your token to have extra functionality, for example transfer fees.
You CANNOT add more extensions to your token mint after you create the token mint account.
Create and upload image and offchain metadata #
Next, we will create the offchain metadata for our token. This data is displayed on sites like Solana Explorer when people look at our token mint address.
The image should be square, and either 512x512 or 1024x1024 pixels, and less than 100kb if possible.
Metadata and media referenced inside (like the image ) must be saved somewhere
publicly accessible online.
For production tokens, a decentralized storage service like one of the following is considered more appropriate:
- Akord - uploads to Arweave; free without sign up for 100Mb; uploads can take a while
- Irys - formerly known as Bundlr, uploads to Arweave
- Metaboss - by Metaplex
- NFT Storage - used by many popular projects
- Pinata - uploads to IPFS; free with sign up for 1Gb
- ShadowDrive - a Solana native storage solution
- web3.storage - requires signing up for a free plan - first 5Gb are free, easy to use
If you are a provider of decentralized storage solutions and want to be listed here, please open a PR using the 'edit page' button.
For a test token, a centralized storage solution like AWS S3, GCP, or GitHub
(using the 'raw' URL format https://raw.githubusercontent.com/... ) is fine.
Upload the image #
First, upload your image file to your desired online storage solution and get the link. Ensure that the link directly opens your image file!
https://raw.githubusercontent.com/solana-developers/opos-asset/main/assets/CompressedCoil/image.pngCreate and Upload the offchain metadata file #
Create a metadata.json file, add a name, symbol and description plus the image
you just uploaded:
{
  "name": "Example Token",
  "symbol": "EXMPL",
  "description": "Example token from Solana Making a Token guide.",
  "image": "https://raw.githubusercontent.com/solana-developers/opos-asset/main/assets/CompressedCoil/image.png"
}
Then upload the metadata.json to the storage provider of your choice. You will
end up with a link similar to this:
https://raw.githubusercontent.com/solana-developers/opos-asset/main/assets/CompressedCoil/metadata.jsonEnsure that the link directly opens your metadata file!
Now, we can add this metadata to our token.
Add the metadata to the token #
As mentioned earlier, this step only works for tokens using the Token
Extensions program ( TokenzQdBNbLqP5VEhdkAS6EPFLC1PHnBqCXEpPxuEb), and not
the older Token Program (TokenkegQfeZyiNwAJbNbGKPFXCWuBvf9Ss623VQ5DA).
Now we will initialize the metadata for our token with the metadata we just created and uploaded.
spl-token initialize-metadata mntTymSqMU4e1NEDdxJ9XoPN4MitCgQ7xxGW6AuRAWQ 'Example token' 'EXMPL' https://raw.githubusercontent.com/solana-developers/opos-asset/main/assets/CompressedCoil/metadata.jsonCongratulations, you created a token with metadata! Look at your token's mint
address (starting with mnt) in Solana Explorer - making sure to to use devnet
(if you are working on devnet).
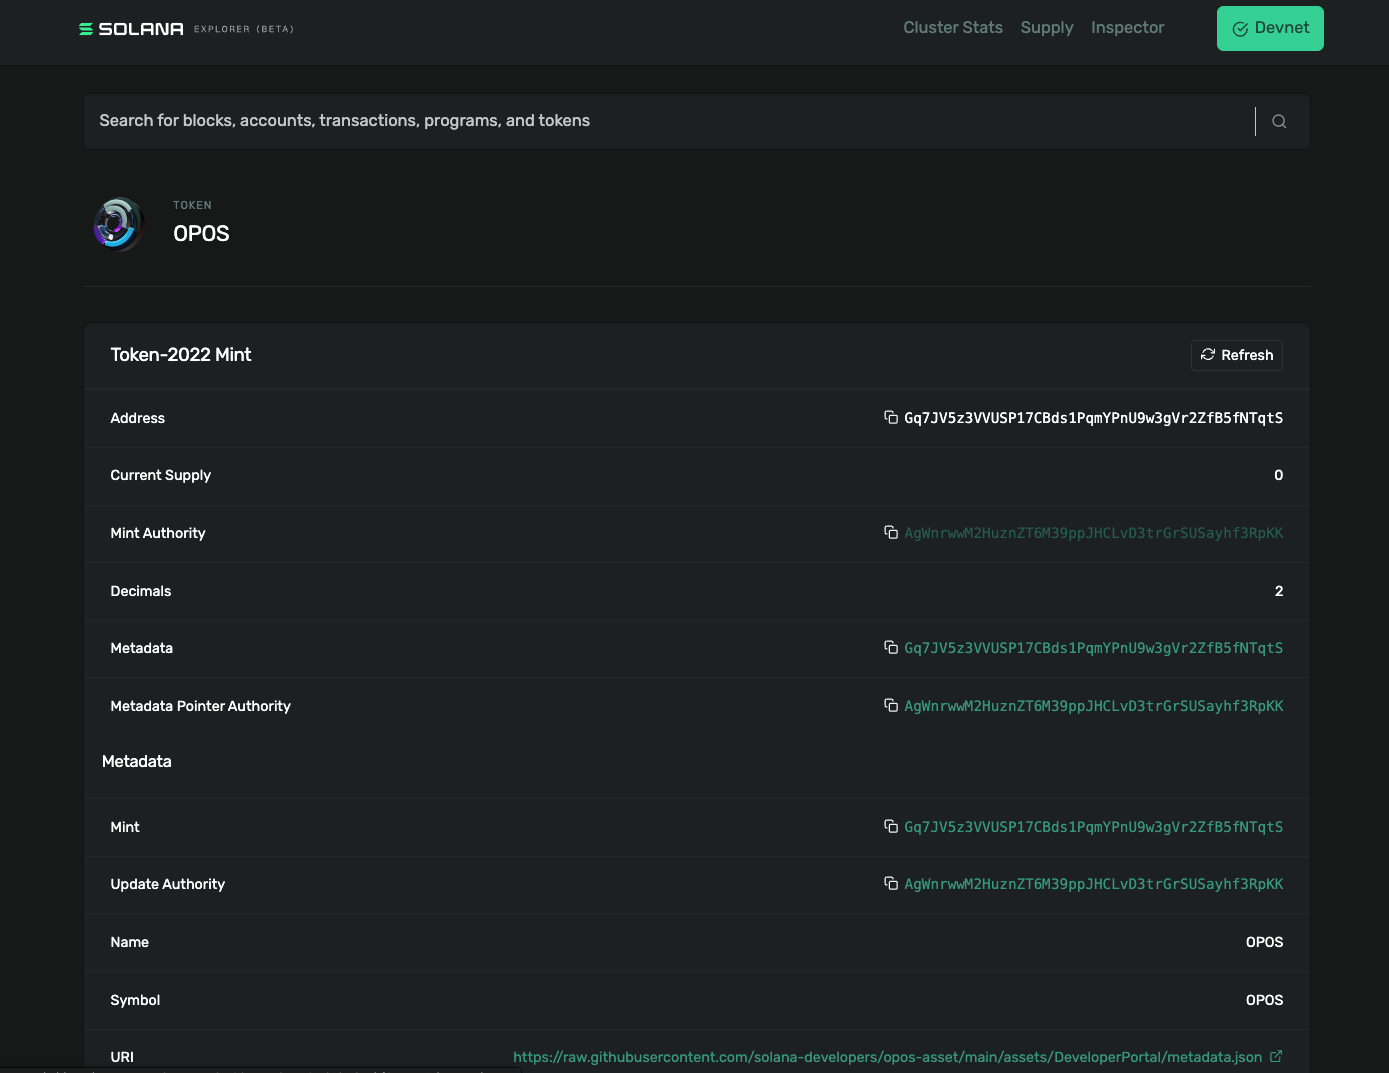 Token with metadata
Mint tokens #
Now that the token is completely set up we can mint some tokens. Let's mint 100.
First we need to create a token account to hold the tokens for our token mint:
spl-token create-account mntTymSqMU4e1NEDdxJ9XoPN4MitCgQ7xxGW6AuRAWQThis will create a new token account for the account that is currently set in the Solana config. You can also specify a different account by adding the address at the end of the command.
And now we can finally mint some tokens into that token account:
spl-token mint mntTymSqMU4e1NEDdxJ9XoPN4MitCgQ7xxGW6AuRAWQ 100Open Solana Explorer and look at your new token balance!
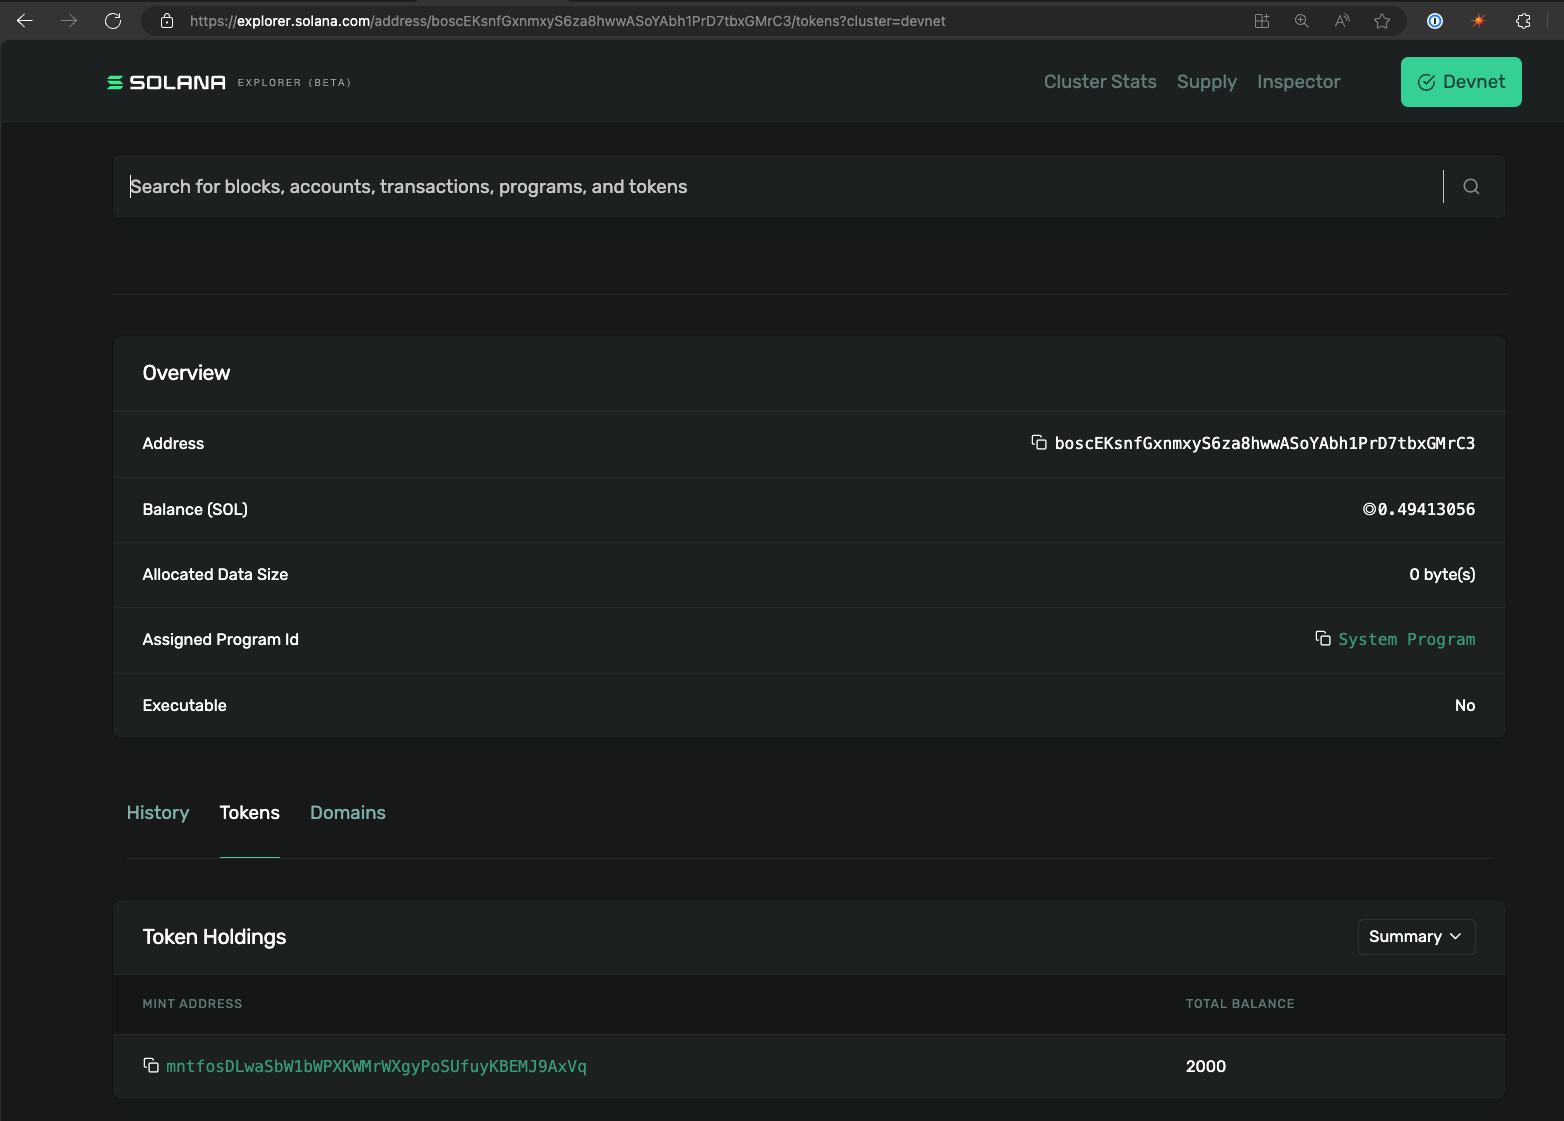 Our minted tokens in our account
Now you can also send the token to another owner of the tokens, for example:
spl-token transfer mntTymSqMU4e1NEDdxJ9XoPN4MitCgQ7xxGW6AuRAWQ 10 (recipient wallet address) --fund-recipientThe --fund-recipient flag allows you to pay to create the token account (i.e.
the account rent) for the recipient.
You have now created a token mint, minted tokens, and transferred them!
Поздравляем!
Further reading about tokens #
- Token extensions - Learn how to add additional functionality to your token.
- External from a16z: 5 rules for token launches - This article outlines key guidelines for launching a token, including regulatory compliance, market conditions, and community engagement, providing a foundation for crypto-entrepreneurs.
- External from a16z: How to navigate token launch risks - This piece discusses how to manage risks associated with token launches, covering issues like legal challenges, market volatility, and technological hurdles, essential for a successful launch.
- External from a16z: Getting ready to launch a token - A preparatory guide for launching a token, covering technical setup, team alignment, regulatory considerations, and engagement strategies, aimed at ensuring a successful public debut.